Holy Matrimony Minestrone
This soup combines the best elements of Italian wedding and minestrone soups into a new original creation which I’m naming “Holy Matrimony Minestrone.” I credit my son for coming up with this witty name.

Holy Matrimony Minestrone
Italian wedding soup typically consists of green vegetables (e.g., escarole, spinach), meat (meatballs) and chicken stock. The name is derived from the Italian term “minestra maritata” (meaning married soup) referring to the fact that the ingredients go well together.
Minestrone is a hearty soup of Italian origin. It is typically made with whatever vegetables are in season, commonly including beans, onions, celery, carrots, tomatoes and stock.
I’ve always enjoyed homemade soup. In fact, one of my greatest food memories is a recollection of times spent with my Nonna (grandma in Italian). She made the most amazing soups. There weren’t any recipes. She made each version from whatever she had in the pantry, and it always tasted delicious! Over the years, I’ve tried to recreate some of her soups. With these memories and her inspiration, I dedicate this soup recipe to her memory.
Chicken Meatballs
1 lb. ground chicken
¾ – 1 cup of breadcrumbs (start with ¾ and add more if needed)
¼ c dried chopped parsley
2 large eggs
2 tbsp. milk
2 tbsp. ketchup
¾ c grated Romano cheese
Freshly cracked sea salt
Freshly ground pepper
Canola oil
In a large bowl mix together the breadcrumbs, parsley, eggs, milk, ketchup, cheese, salt and pepper. Combine the mixture with the ground chicken. Mix well, but don’t overwork the meat mixture. Using a small sized cookie scoop, scoop up the mixture and roll it into small balls. Place the balls onto a wax paper lined dish.

Scoop up the mixture and roll it into small balls
Heat about 1” of oil in a large skillet over medium heat. Once the oil is heated, add about 10-12 meatballs at a time, placing them carefully into the hot oil. Cook without moving until they are browned on the bottom (about 2-3 minutes). Turn the meatballs and brown on the other side (about 2-3 minutes longer).
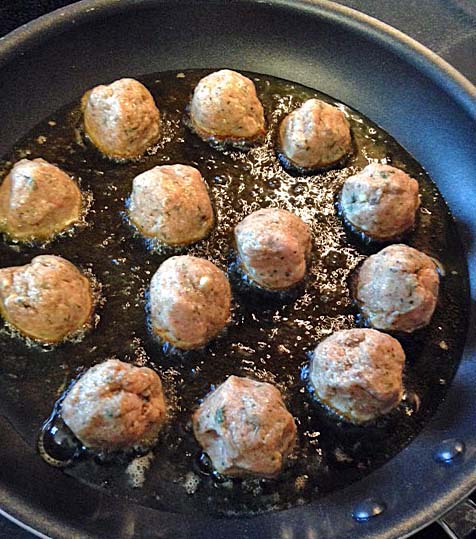
Cook the meatballs until they are browned
Transfer the cooked meatballs to a paper towel lined plate and set aside. Continue this frying process until all the meatballs are cooked.

Transfer the cooked meatballs to a paper towel lined plate and set aside
This recipe will yield about three dozen mini meatballs. You’ll only need about 30 for the soup so save the rest for a nice grinder. I prefer chicken meatballs for this soup, as they are lighter and better suited for soup than beef ones.
Holy Matrimony Minestrone Soup
2 tbsp. olive oil
4 medium-sized shallots, finely chopped
4 celery stalks, roughly chopped
4 carrots, peeled and roughly chopped
3 garlic cloves, cleaned and minced
3 tbsp. tomato paste
2, 14-oz cans of petite diced tomatoes, not drained
75 oz. chicken stock (low sodium, fat free) (one box and 3 cans)
¼ c fresh parsley, minced
1 ½ cups small pasta (such as tubetini, small egg bow ties or tiny shells)
1 can of chickpeas, drained and rinsed thoroughly
½ bag baby spinach, chop the leaves in half
Salt & pepper to taste
In a large stockpot, heat the olive oil over medium heat. Add the shallots and allow cook for 2 minutes. Add the celery and carrots. Sauté for 5 minutes, until they begin to soften. Add in the garlic and sauté for a minute. Add the tomato paste, chicken broth, diced tomatoes (with the juices) and the parsley. Bring to a boil and reduce the heat to simmer, cooking for 20 minutes.

Bring the soup to a boil and reduce the heat to simmer.
Add 3/4ths of the meatballs to the soup. Allow simmering for 5 minutes.
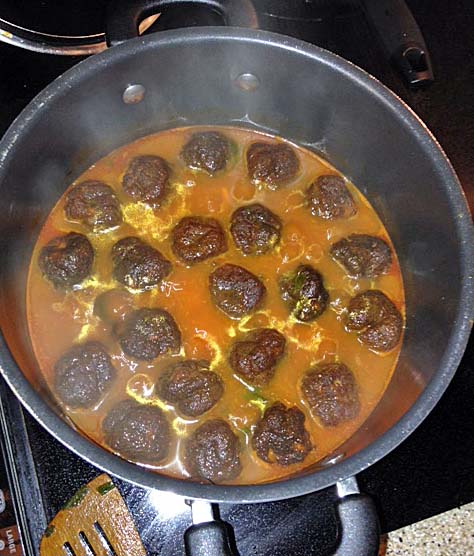
Add the meatballs to the soup and allow to simmer for another 5 minutes.
Add the chickpeas and the pasta. Let it cook for another 10 minutes. Lastly, add in the spinach and let it cook until the leaves start to wilt (about a minute).
Remove from the heat and serve immediately.
Ladle the soup into bowls and pair it with sliced rustic, crusty bread. Finish the soup with grated Parmesan cheese, if desired.

Ladle the soup into bowls and pair it with sliced rustic, crusty bread. Finish the soup with grated Parmesan cheese.
Serves 6-8
Leftovers will keep in a sealed container for 3-4 days in the refrigerator. To reheat, simmer over medium to low heat until the meatballs are hot through.

This soup is very hearty and with the meatballs in it, you will find yourself needing a fork and knife in addition to a spoon in order to eat it!
This soup is perfect once the chilly weather hits. It is very hearty and with the meatballs in it, you will find yourself needing a fork and knife in addition to a spoon in order to eat it.
I quantify this recipe as “medium” difficulty. I give it that rating not because it requires extensive culinary expertise, but because it requires some time to assemble all the parts. Trust me it’s worth the time to make!
I hope you “fall in love” with this recipe as much as my family has, and enjoy it as much as “I do.”
What’s your favorite soup?
Do you use a recipe to make soup or do you create it “on the fly?”